As many of you know, my Halftone app was featured by Starbucks as its Pick of the Week this past August. I visit Starbucks daily for my morning caffeine fix, and over the course of a couple weeks, I managed to collect a small stack of the Halftone cards. They’ve proven to be a fantastic promotional tool and a very handy way to give someone a free copy of the app.
They’re so useful that I decided to make my own app promo cards for an upcoming event (larger image).
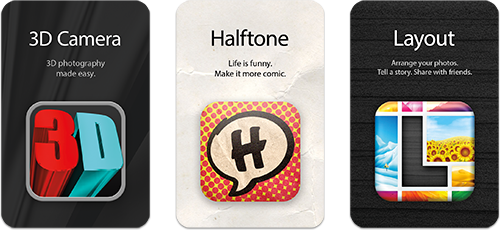
It took me a little time to simplify the workflow, but if you follow my instructions closely (and optionally use the included templates), you should be able to create your own cards in an hour or two. Best of all, the general process will work for anything that needs to feature custom codes or text…it doesn’t have to be an app, and they don’t have to be cards.
Before I get started, I’m using Adobe Photoshop CS6 Extended, but I don’t believe that any of the features I’m using are unique to the Extended edition, so the standard edition of Photoshop CS6 should be fine. The general technique should also work on older versions of Photoshop, though you might not be able to use the templates or the action that I’ve provided in this post. Other than Photoshop and a simple text editor like TextEdit or Notepad, no other software is necessary.
Promo Codes
Before you decide to make your own cards, you need to think about how you’re going to use the limited set of 50 promotional codes that Apple provides and how you’re going to print them. Apple’s promotional codes are good for four weeks from the day they’re generated (not a month or 30 days as many sites indicate). With global distribution and the fact that the codes have no visible timestamp, I’d suggest computing the expiration date as the date that the codes were generated + 27 days. This way, you’ll be on the safe side, and users who try the code on the 28th day may be pleasantly surprised. As an example, for codes generated on October 1st, I’d suggest using an expiration date of October 28th.
If you’re going to generate the cards and print them yourself, timing probably isn’t as big of an issue. But, if you’re going to have them printed professionally, you need to take the code generation date into account. I’d suggest generating the codes just before you need them. In the meantime, you can use the sample set of codes that I provide later in this post.
MOO
I love MOO, and I especially love their rounded business cards ($23.99 USD for a set of 50 as of this writing). The shape works very well for cards like this. Everything I’ve received from them over the years has been of very high quality. They also allow you to upload full designs where the back of each card is completely unique (though the front has to be consistent across the batch). This is perfect for printing promo codes. The only trick is how to generate the unique card images.
MOO’s minimum order for business cards is 50. Unless you plan to use all 50 of your promo codes in a single print run, you’ll need to think about what you want to do with the “extra” cards. I’ve designed the front of my cards to feature the app name, a short tagline, and its icon. There’s nothing to indicate free codes on the back (like there is on the Starbucks cards). Because of this, I can upload alternate designs for the remaining cards. For my recent order, I split the remainder between a general “Juicy Bits info” design and my own personal business card.

The Data File
To generate the unique cards, we’re going to use the little-known but very powerful data-driven graphics features in Photoshop. Think of it as “mail merge for Photoshop.” We’ll provide a data file of promo codes and merge them with a template. Then, we’ll tell Photoshop to generate a unique image for each combination. Finally, we’ll convert the files to PDF and submit them to MOO. You should be able to follow similar steps to print your own cards or to upload them to another service.
First, you’ll need to create the data file of codes. If you’re using Apple promo codes, the text file you download from iTunes Connect is very close to the correct format. After you download the file, open it in your favorite text editor and add “Code” (without the quotes) as the first line of the file. This is the name of the variable we’ll use in our template, and Photoshop requires the variable name on the first line.
If you’re creating your own text file, start with “Code” on the first line and list one code per line. Name the file with a .txt extension to make it easy to select.
Here’s a sample file of ten expired codes that you can use during your design and testing phases.
The Template
The next step is to create the promo card template in Photoshop. If you plan to use MOO, you can either use a PSD template from their Templates and guidelines page or you can download the customized version that I’ve created to save time. Note that the standard Business Cards template on the MOO page will work with both square and rounded corners. Here’s what my version looks like:
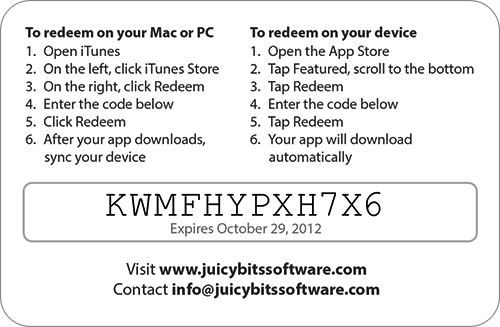
If you’re creating your own template, add a new text layer anywhere in your document and name it “Text Sentinel”. This layer doesn’t have to be visible (I hide mine), nor does it need to contain any text, but the custom action provided later uses this to automatically convert text layers to vector shapes before creating the MOO PDF file. If you’re using my template, this layer is already in the file.
Next, design the back of your card using the template. Anything goes, as long as it fits within the safe area for printing (indicated in the templates). No Photoshop features are off-limits.
When you’re ready to place the actual promo code, create a new text layer. The name of this layer isn’t important, and you can format it however you’d like (fonts, layer styles, etc.). I’d recommend using a font that makes it easy to disambiguate potentially confusing number and letter combinations like 0/O and 1/I. However, I’ve noticed that none of the Apple promo codes I’ve generated contain those letters or numbers, so this probably isn’t as important for Apple codes.
To connect our data file to this text layer, make sure the layer is selected, then choose Image/Variables/Define…. Check the Text Replacement option and change the Name from the default “TextVariable1” to “Code”. This tells Photoshop to use the “Code” values in our data file.
Click Next, then Import… to select the data file of codes. Leave the other options as-is:
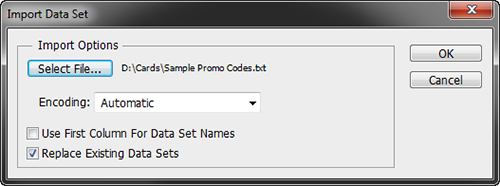
Click OK. If Preview is checked, you’ll see a code from the data file in your design, confirming the data connection. Click OK to exit the variables window (note that the previewed code will return to your default text, but there’s no cause for alarm).
Your Photoshop template is now complete.
Merging the Codes
The next step is to merge the data file with the template to create intermediate Photoshop PSD files, each containing a unique code. If you’re using my template, be sure to hide the Background for Design group and unhide the Background for Submission group. This replaces the nice rounded corners that are helpful during the design phase with a full-bleed background color.
Choose File/Export/Data Sets as Files…, then click Select Folder to choose an output folder. The output folder can be anywhere you’d like, but I’d recommend creating a new, empty folder so that the batch process we use later will only pick up this set of files.
Make sure the rest of the dialog matches the defaults in this screenshot. The filename construction isn’t important, as these are only intermediate files. We’ll name them more intelligently during the conversion to PDF step.
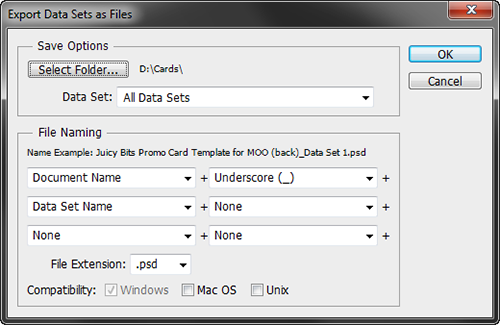
Click OK to begin the export process. When it’s done, you should see a set of unique PSD files in your output folder. If you’re printing your own cards, you can use these files as-is. If you’re planning to use MOO, continue reading.
Converting to PDF
To ensure the highest quality output and color accuracy, MOO prefers PDF files that conform to the PDF/X-1a ISO standard with a Coated GRACoL 2006 color profile. If you’re interested in more detail, check out MOO’s article: Using my own artwork.
I’ve created a Photoshop action to help automate the conversion to PDF. First, the action finds the layer named Text Sentinel, then it selects similar layers (meaning: all text layers). Next, it converts those text layers to vector shape layers, and finally, it exports the file as a MOO-compliant PDF. The text-to-shape conversion needs to happen at this step in the process, because there’s no other way to get the promo code text into a vector format.
If you haven’t already, you can close your template file.
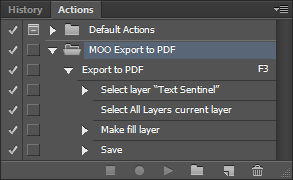
Download my MOO Export to PDF action set, unzip it to a folder of your choice, then switch to the Actions panel in Photoshop (choose Window/Actions if you can’t see it). Click the menu icon in the upper-right corner of the Actions panel, and select Load Actions…. Find the MOO Export to PDF.atn file that you unzipped, then click Load. You should see the new action set in your Actions panel:
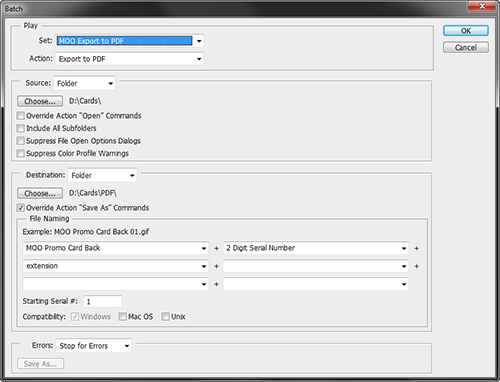
Select File/Automate/Batch…. For Set, choose MOO Export to PDF (the action set you just loaded). For Action, make sure Export to PDF is selected. For Source, choose Folder. Click Choose… and navigate to the folder you exported your intermediate PSD files to, then click OK.
For Destination, choose Folder, then click Choose… and choose a folder for the PDF files that the batch process is going to create. I make a folder called PDF just to keep things separate. Click OK.
Make sure Override Action “Save As” Commands is checked. You can leave the File Naming as-is, but I like to customize it as seen in this screen shot:
Finally, click OK to run the batch. When it’s done, you should have a folder of PDF files that are ready to be uploaded to MOO.
The Front
As mentioned earlier, MOO cards share a single front design. So, take a moment to create a separate Photoshop file with a design for the front of the card. Since we’re not creating multiple versions for this side, there’s no need to create variables or data sets. Feel free to download my template to get you going. Here’s what it looks like:
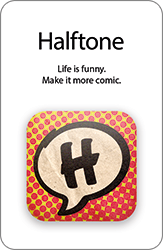
To export this as a PDF file for MOO, select all of your text layers, then choose Type/Convert to Shape. Then, choose File/Save As…, and select Photoshop PDF (*.PDF; *.PDP) for the Format. I’d recommend saving the file to the same PDF folder as before; name it something like Promo Card Front. Click Save.
Choose [PDF/X-1a:2001] for Adobe PDF Preset, then select Output from the list on the left. Change Color Conversion to No Conversion (since the templates already include the correct color profile), and change Profile Inclusion Policy to Include Destination Profile. Finally, click Save PDF.
Uploading to MOO
Go to MOO (and if you use my affiliate link, you and I might get some credit…thanks in advance). Choose Rounded Corner Business Cards from the Business Cards menu at the top, then click on the Use your complete design button. Click the Upload your images button to begin your design.
In the Corners area near the top, make sure that the Rounded icon is selected (if you want them rounded, of course).
Click Add design or images, then Upload images from the Computer tab. Navigate to the PDF folder you created earlier (that should include your front design too) and select all of your PDF files. They’ll begin uploading to MOO. Depending on the size of your files and available bandwidth, this is a great time for a quick coffee break.
When the files are done uploading, select your front design, and click Use as full design. The front of your card is now complete, so click Next step to design the backs.
Click Add images or designs in the upper right, then select all of the “back” designs. I do this by clicking Select all, then de-selecting the front image. Click Make cards with selected to auto-populate the backs. For extra cards, I don’t know of a way to auto-populate a specific quantity, so you’ll have to drag your “extra” design(s) from My images at the top to each blank Add a new design card to fill them up. Just keep going until MOO pops up a warning to tell you that you’ve reached 50 cards.
Finally, click Next step to continue with the checkout process. If you’re curious, I like the Classic paper, Rounded corners, and a Matte finish. The expedite fee is very reasonable too, especially if you want to maximize the time you have before your promo codes expire.
Final Thoughts
As a developer, I wish Apple would allow me to purchase additional promotional codes. I’d be happy if they had the exact same restrictions (i.e. no ratings or reviews, and no impact on charts/popularity). That way, I could print a whole set of 50 MOO promo cards and not worry about the expiration dates, because I could always buy more. Of course, I can always update an app to get a new set of 50 codes, but I don’t like the idea of updating an app just to get more codes.
There is also an opportunity for someone to create a Mac/PC app that automates this process. If I had more time, I’d do it myself, but as a one-man shop, my time is limited. MOO even has an API that allows an app maker to receive a 15% commission on sales. I can imagine an app where I provide a template (perhaps just a simple PNG image), define a location for the code (with some simple font formatting controls), and point to my text file of codes. The rest could be completely automated, including the upload to MOO. It wouldn’t have to be limited to apps or business cards either. The more I think about it, MOO should add the ability to upload and merge the codes right on their site.
This technique can be used for anything where codes or unique text (and images too, by the way) need to be included in a design. I hope this post has been helpful to someone out there. If you design your own cards using this technique, add a comment to this post with a link to photos of your project. We’d all love to see what you create!
Leave a Reply