As more of you experiment with immersive and spatial video, one of the most common questions I get is: how can I encode my own stereoscopic video to MV-HEVC? Especially if you don’t want to rely entirely on Apple’s AVFoundation or if you don’t work as often with Mac hardware. In this post, I’ll walk through two approaches, one using the open source x265 encoder with multiview support, and another using NVIDIA’s sample encoder.
While writing this post, Google announced updates to their Android XR SDK with Developer Preview 2:
With the Jetpack XR SDK, you can now play back 180° and 360° videos, which can be stereoscopic by encoding with the MV-HEVC specification or by encoding view-frames adjacently.
It’s great to see other companies embracing MV-HEVC!
Fair warning: if you aren’t interested in MV-HEVC technical details and just want to encode video, skip to the end and download Dean Zwikel’s free PC-based AIVC tool. Or, if you’re on a Mac, grab my free spatial command-line tool.
With that out of the way, let’s get started.
Y’CbCr
Before we can encode anything using x265 or NVIDIA’s sample encoder, we need to convert our stereoscopic video to a format that these tools understand. This typically means that we need to convert from an .mp4 or .mov file into raw Y’CbCr video.
Y′CbCr is a family of color‐encoding schemes where an image frame’s color information is separated into one luma component (Y′) representing the gamma-corrected brightness (or “black-and-white” content), and two chroma components (Cb and Cr) that encode the blue-difference and red-difference signals, respectively. Cb, or chroma-blue, is also referred to as U, and Cr, or chroma-red, is referred to as V.
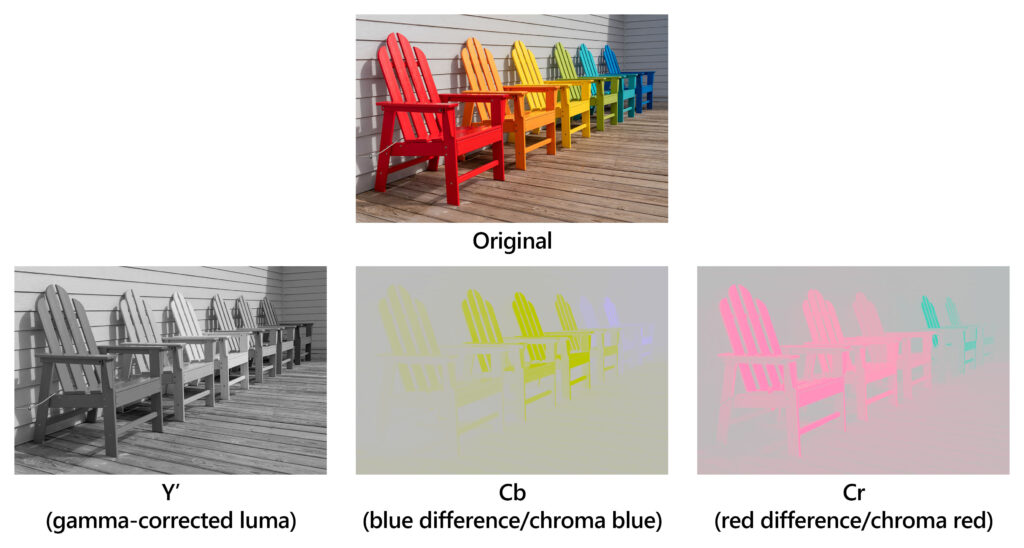
By decoupling luminance from chrominance, Y′CbCr enables efficient compression and transmission—human vision is more sensitive to brightness detail than to color detail, so the Cb and Cr channels can be subsampled without severely impacting perceived image quality. It is the standard color space for virtually all video and image compression formats.
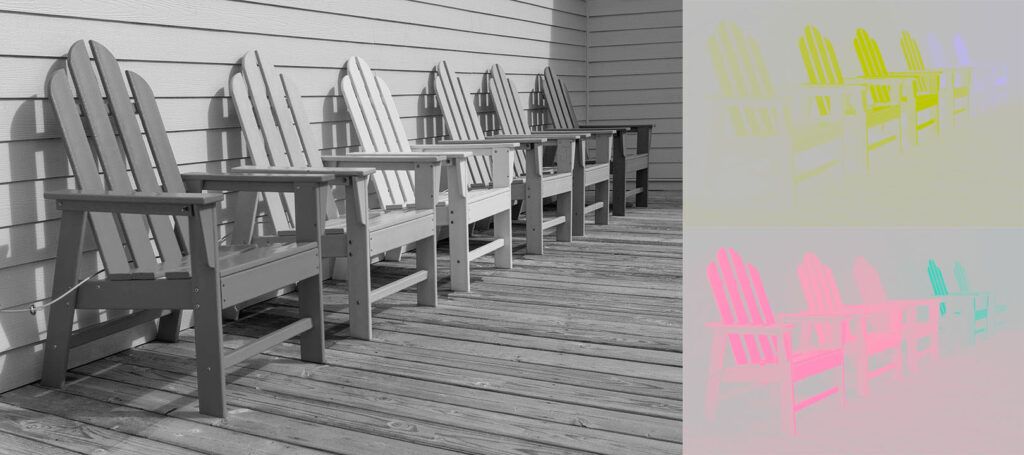
With 4:2:0 subsampling, the Cb and Cr channels carry less color information, naturally reducing the image payload. The following image represents these relative size relationships.
Raw .yuv
Many of you are familiar with .mov, .mp4, .webm, and .mkv files, and these are formats that we frequently encounter. These are so-called container formats, and while they contain encoded audio and video bitstreams, they also include a lot of metadata about things like frame dimensions, media durations, frame/sample rates, color spaces, transformations, and much more. This metadata is what makes it possible to parse and understand their media tracks for processing and playback.
A raw .yuv file, then, is just uncompressed, planar (meaning each color channel is in its own continuous plane of bytes) video data—a flat dump of pixel values, very similar to the Y`CbCr set of example images above. There’s no header, no frame size, no timestamps, no color space information, no metadata. Just pixel bytes.
You can also think of it like a PCM audio dump versus an MP3. Raw .yuv is the uncompressed form before any codecs get involved. Every frame is stored one after another, and unless you know the width, height, pixel format, and frame rate ahead of time, the file is nearly unusable.
When video is decoded for processing or playback, this is the format that is used internally by the playback hardware/software before its final output. A raw format is literally an export of that data. It’s also important to understand that raw video isn’t compressed in any way, so it isn’t “H.264” or “HEVC” or “AV1”, because all those formats eventually encode to, or decode from it.
And because they’re uncompressed and at full-fidelity, these files are huge. For example:
- Per frame: 1920 × 1080 pixels × 1.5 bytes/pixel ≈ 3,110,400 bytes ≃ 3.1 MB
- At 30 fps: 3.1 MB × 30 ≃ 93 MB/s
- One minute (60s): 93 MB/s × 60 ≃ 5,580 MB ≃ 5.6 GB
- Stereo (two views) doubles it: ≃ 11.2 GB/min, so 10 min ≃ 112 GB
This raw format is exactly what x265 and NVIDIA’s encoder both require. If you’re wondering why you’ve never had to work with these huge raw .yuv video files, it’s because most tools (FFmpeg, Adobe Premiere Pro, DaVinci Resolve, Final Cut Pro, etc.) perform this conversion step behind the scenes and in memory only. Note that we’re going to work with Y’CbCr 4:2:0 files in this post, but all these steps work with other subsampling formats too.
Converting to Raw
To convert container .mp4 or .mov files to raw .yuv, I highly recommend using the free open source tool, FFmpeg. I usually download the latest “full” Windows build from gyan.dev (one of ffmpeg.org’s recommended sources). These builds also include ffprobe, and we’ll use that tool to interrogate some of our files. Installing FFmpeg on Windows has a good walk-through that includes adding FFmpeg to your search path.
Of course, it would be too convenient if both x265 and NVIDIA accepted the same raw files. Instead, each of them likes to see the raw video frames provided and arranged in slightly different ways.
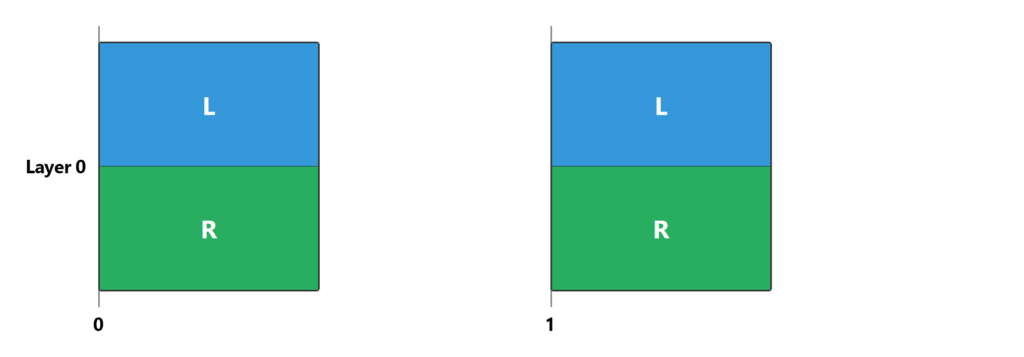
x265 supports three input options. Because all of them involve individual files (not multi-layer files like MV-HEVC), you’ll only see layer 0 represented. Otherwise, each frame is shown at time 0 and time 1 (at 30fps, that would be 0/30, and 1/30).
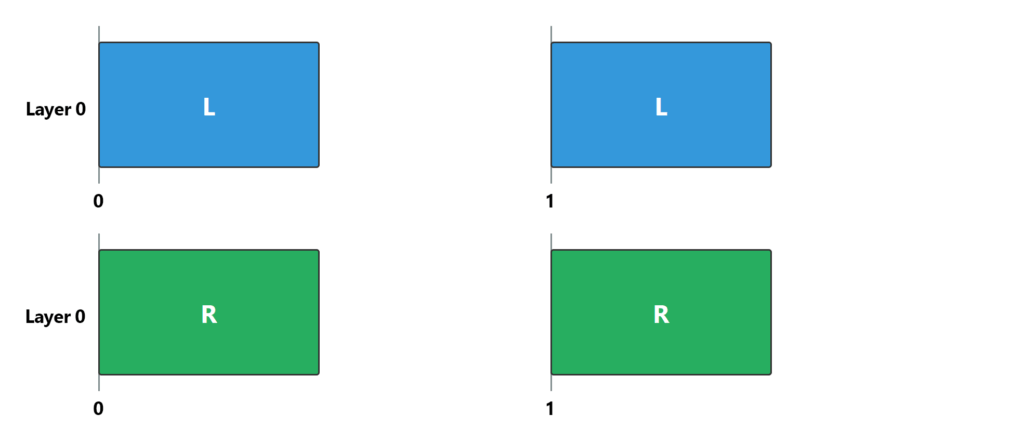
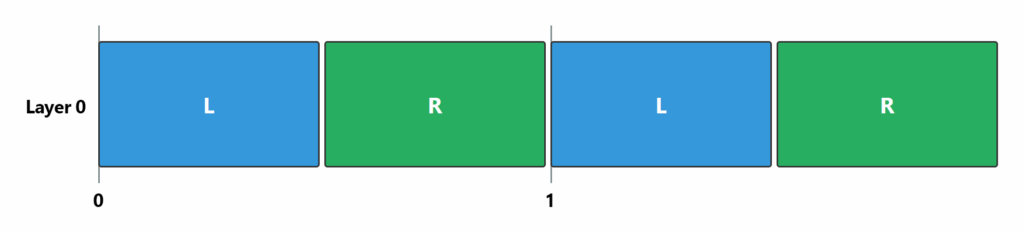
NVIDIA, on the other hand, expects raw .yuv video to be interleaved, with a left-eye frame followed by a right-eye frame, followed by the next left-eye frame, then its right-eye frame, etc.
Probe the Source
Depending on your source video, there are many possibilities for converting it to raw .yuv. Let’s start with video that is already in MV-HEVC format, just because it’s easy to capture this kind of video with a modern iPhone (or Vision Pro). Yes, I realize that you might not want to re-encode already-encoded MV-HEVC video back to MV-HEVC, but we’re learning here, so humor me.
Referencing Views
For video that is already encoded with MV-HEVC, you can reference individual views (which map to eyes) with FFmpeg 7.1 or later by using a special syntax. For example, 0:v refers to the video track of the first input (and 0:a is the first audio track, etc.). For MV-HEVC-encoded video, you can extend that syntax by including a view index, so 0:v:view:0 references the first input’s video track’s first view. Likewise, 0:v:view:1 references the second view. It helps to remember that developers like to start counting at 0.
Within the MV-HEVC file, each view index maps directly to a layer. You can read more about this in Encoding Spatial Video.
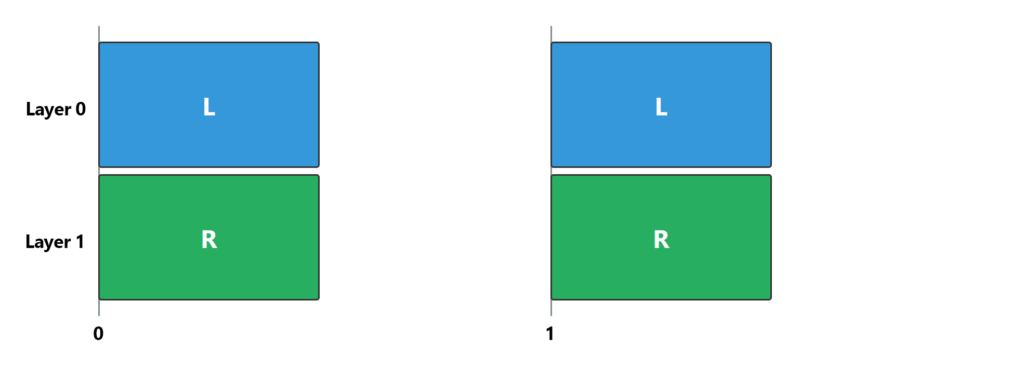
But hold on! We need to know which view represents which eye in our source media, because it isn’t always 0=left and 1=right (as illustrated), an extremely common and unfortunately incorrect assumption. To find out, we can use ffprobe 7.1 (or later) to interrogate the first video track of our source file by asking for some metadata. We’re going to ask for a bunch of metadata that we’ll use during our workflow, so keep the results handy.
ffprobe -v quiet -select_streams v:0 -show_entries stream=width,height,r_frame_rate,pix_fmt,color_range,color_primaries,color_transfer,color_space,view_ids_available,view_pos_available -of default=noprint_wrappers=1 mvhevc_input.movYou should see output like:
width=1920
height=1080
pix_fmt=yuv420p
color_range=tv
color_space=bt709
color_transfer=bt709
color_primaries=bt709
view_ids_available=0,1
view_pos_available=2,1
r_frame_rate=30/1
This ffprobe output confirms that there are indeed two view IDs present in the video track: view_ids_available=0,1. We also see a list of view positions which are provided in corresponding order: view_pos_available=2,1. Armed with the knowledge that 1=left and 2=right, we can determine that—for this file—view ID 0 represents the right-eye view and view ID 1 represents the left.
Pixel Formats
To retain the quality of our source media, it’s important to use the correct raw output format. Fortunately, the ffprobe report shows that our video has pix_fmt=yuv420p which is implicitly understood to be 8-bit Y’CbCr 4:2:0. If our source was encoded with a higher bit depth, you might see yuv420p10le (for 10-bit), yuv420p12le (for 12-bit), or even yuv420p16le (for 16-bit). We’ll need to carry this pixel format through our workflow. Check out What are 8-bit, 10-bit, 12-bit, 4:4:4, 4:2:2 and 4:2:0 if you want to know more.
Convert
Now, we can use FFmpeg to decode each of those views into its own raw .yuv file while retaining the source pixel format. Notice how 0:v:view:1 outputs to left_view.yuv and 0:v:view:0 outputs to right_view.yuv in this example, since that’s the view-ID-to-position mapping that we learned from our ffprobe output.
ffmpeg -i mvhevc_input.mov -an -map 0:v:view:1 -pix_fmt yuv420p -strict -1 left_view.yuv -map 0:v:view:0 -pix_fmt yuv420p -strict -1 right_view.yuvAs mentioned earlier, NVIDIA’s tools expect raw .yuv data to be interleaved. To do that instead:
ffmpeg -i mvhevc_input.mov -an -filter_complex "[0:v:view:1][0:v:view:0]interleave,format=yuv420p[out]" -map "[out]" -pix_fmt yuv420p -r 60 -f rawvideo stereo_interleaved.yuvThe interleave filter takes multiple video inputs and outputs a single stream by taking one frame from each input in sequence. Since we’ve provided view 1 first and then view 0 to the interleave filter, it will output a frame from view 1, then a frame from view 0, then the next frame from view 1, then the next frame from view 0, and so on.
You might notice that we included -r 60 in the command. I said earlier that raw .yuv video files don’t contain metadata like frame rate, and that is true here. However, the interleave filter needs to know how to interpret the frame rate during processing. Also notice that the frame rate has been doubled from 30fps to 60fps, because we now need to interleave two frames for each single “frame” in the MV-HEVC-encoded source media.
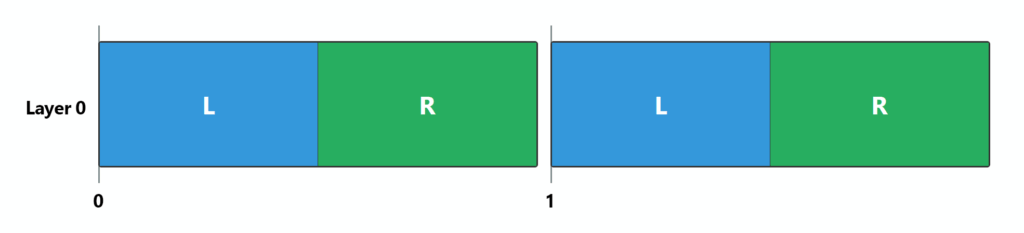
Side-by-Side and Top/Bottom
What if your source video is already in a side-by-side or top/bottom layout? Well, x265 accepts both of these layouts, as long as we convert them to raw .yuv:
ffmpeg -i input.mov -pix_fmt yuv420p -f rawvideo stereo.yuvNote that we don’t have to specify any views, because we’re converting the full frames as they are.
To encode with NVIDIA’s encoder, remember that we need to interleave the raw .yuv file. For a top/bottom source layout with the left eye on the top:
ffmpeg -i tb_input.mov -an -filter_complex "[0:v]split=2[top][bottom];[top]crop=in_w:in_h/2:0:0[left];[bottom]crop=in_w:in_h/2:0:in_h/2[right];[left][right]interleave,format=yuv420p[out]" -map "[out]" -pix_fmt yuv420p -r 60 -f rawvideo stereo_interleaved.yuvHere, we’re using the split filter to create two copies of each input frame, one labeled top and the other labeled bottom. Then, we use the crop filter to keep only the top portion of its frame and label it left. Likewise, we crop the bottom portion and label it right. Note the in_h/2 calculations that take the automatically provided input height value and divide it by 2. This ensures that our filter chain works correctly with any source video dimensions.
As before, we double the input frame rate to help the interleave filter, and that’s it. By the way, if you’ve never taken a moment to appreciate the true power and value of FFmpeg, now is the time to do it! You can even make a well-deserved donation.
For a side-by-side source layout with the left eye on the…err…left:
ffmpeg -i sbs_input.mov -an -filter_complex "[0:v]split=2[left][right];[left]crop=in_w/2:in_h:0:0[left_eye];[right]crop=in_w/2:in_h:in_w/2:0[right_eye];[left_eye][right_eye]interleave,format=yuv420p[out]" -map "[out]" -pix_fmt yuv420p -r 60 -f rawvideo stereo_interleaved.yuvYou can probably now follow the crop filter math, but notice that I had to name the output of the crop filters with _eye postfixes, since the original left and right labels refer to the side of the original frame itself.
Whew! That was a lot of work. Or hopefully, a lot of good learning! In a real-life workflow, we’ve only accomplished two steps so far:
- Run ffprobe to learn about our source video file.
- Export raw video with FFmpeg.
It just seems like a lot.
x265
Before you can encode anything with x265, we need to get a build of the x265 encoder running on your system. Unfortunately, there is no convenient place (that I’m aware of) to download pre-made builds of x265, so you’ll have to make one yourself (or ask a developer friend). If you aren’t a developer, these steps may look intimidating. But if you follow along, I think you can do it with just a little bit of computer knowledge. Or, bail out while you can and download Dean’s free AIVC tool.
Since we’re mostly talking about Windows here, I’ll walk you through creating a Windows build, but x265 can also be built for macOS and Linux. See the x265 Wiki and README.txt file for additional details. Fortunately, you only need to build it once.
Building x265
To build x265, you need the latest x265 source code. Navigate to the x265 Downloads area and download the newest file in the list. As of this writing, x265_4.1.tar.gz is the latest (or, for developers: git clone https://bitbucket.org/multicoreware/x265_git.git).
From the Windows File Explorer, find your downloaded file, right-click it, and choose Extract All… to extract it to a directory of your choice. If you don’t see an Extract All… option, you might need to use another method to extract the files with your Windows version. Feel free to accept the suggested location, but make sure you take note of it; we’ll need to find the directory later.
Now that we have the source code, we need Visual Studio to build it. Let’s download the freely available Community edition. During installation, be sure to choose Desktop development with C++ under the Workloads tab.
x265 can optionally use the NASM assembler for improved performance. I downloaded the “installer” version. I’m not sure how much this helps with MV-HEVC encoding, but I’m using it just in case. If someone knows more about its impact, please contact me or leave a comment.
Now that we have all the tools installed, tap your Windows key, search for Developer Command Prompt for VS 2022, and run it. The developer command prompt adds a set of handy tools to our search path, and that makes our build steps just a little easier.
From the command prompt, change to the directory where you extracted your x265 source code followed by \build\vc17-x86_64. For example:
cd \dev\x265_git\build\vc17-x86_64If you installed NASM, we need to add it to our search path so it can be found by the build process. I’m showing the default installation path in this example, but if you installed it somewhere else, just reference that directory here. If you didn’t install NASM, you can skip this step.
path=C:\Program Files\NASM;%PATH%Now, let’s create the files that enable us to build x265, making sure that we include ENABLE_MULTIVIEW=ON. Without that flag, the MV-HEVC multiview features won’t be available. Yes, the D that’s mushed in front of the flag is required…it means to “define” that value:
cmake -G "Visual Studio 17 2022" -A x64 -Wno-dev -DENABLE_MULTIVIEW=ON ....\sourceWith the build files in place, we can build the x265 release version:
MSBuild /property:Configuration="Release" x265.slnWhen the build completes, you should have a fully functional version of x265 with MV-HEVC support in the Release sub-directory, so let’s change to it:
cd ReleaseLast, but not least, make sure that x265 runs and reports version 4.1 (or later):
x265 --versionCongratulations! If something didn’t work, be sure to reference the x265 Wiki and README.txt that I mentioned earlier. If you want to keep your x265 build somewhere else, just copy the whole Release folder.
Encoding with x265
x265 is an extremely capable tool with a lot of configuration options, and there’s no way to cover them all here. If you want to know more, be sure to browse the full documentation.
Multiview Configuration File
To encode MV-HEVC using x265, we first need to create a multiview configuration file. You can use any plain text editor (like Notepad) to create a configuration file that looks like this:
#Configure number of views in the multiview input video#
#--num-views <integer>#
--num-views 2

#Configuration for the input format of the video#
#--format <integer>#
# 0 : Two separate input frames#
# 1 : One input frame with left and right view#
# 2 : One input frame with top and bottom view#
--format 0

#Configure input file path for each view#
##NOTE: Other input parameters such as input-csp/input-depth/fps must be configured through CLI##
#--input "left-right.yuv"
--input "left_view.yuv"
--input "right_view.yuv"
For spatial video, we’ll always have two views, so --num-views 2 is correct. Set the format to the kind of raw .yuv file(s) you created earlier. Last, add one or two inputs that point to your raw .yuv files. Save the configuration file with a name like multiview.cfg, though the name is completely up to you.
Color
We’re almost ready to use x265 to encode our raw .yuv video! But before we do, we need to make sure that the color information in our source video carries through to our final output. And since we’ve learned that the raw .yuv file doesn’t contain any metadata at all, we have to provide it.
Fortunately, the earlier ffprobe output from our source file gives us everything we need. Remember that these examples are based on my media file…yours will likely be different, so adjust accordingly. Here are the color values that we care about:
color_range=tv
color_space=bt709
color_transfer=bt709
color_primaries=bt709
Together, these values specify how the pixel data in our video file translates to colors in the output. Color science is a very deep topic, and it’s definitely too much to cover in this blog post. If you’d like to know more, though, I highly recommend reading A journey through color space with FFmpeg and Colorspace support in FFmpeg. Essentially, these color parameters answer the question: “how does the value 26 in my pixel data translate to the correct shade of red in my output?” When you set these color values in x265 you burn them into the SPS/VPS of the elementary stream.
In x265 parameter-speak (with associated values from our ffprobe report):
--colorprim=color_primaries--transfer=color_transfer--colormatrix=color_space--range="limited"ifcolor_range=tvor"full"ifcolor_range=pc
The only remaining parameter to understand is profile. Fortunately, that one is easy. If your source is 8-bit, use main. Otherwise, use main10 for everything else.
Finally, we have enough to encode our video with x265.
x265 --multiview-config multiview.cfg --fps 30.0 --input-res 1920x1080 --profile main --colorprim "bt709" --transfer "bt709" --colormatrix "bt709" --range "limited" --preset "slow" --crf 28 --output output.hevcBy the way, there are many presets you can choose from, each providing a trade-off between encoding speed and compression efficiency. There are also multiple methods to control quality and bitrate. In this example, I’ve used a Constant Rate Factor (crf) of 28.
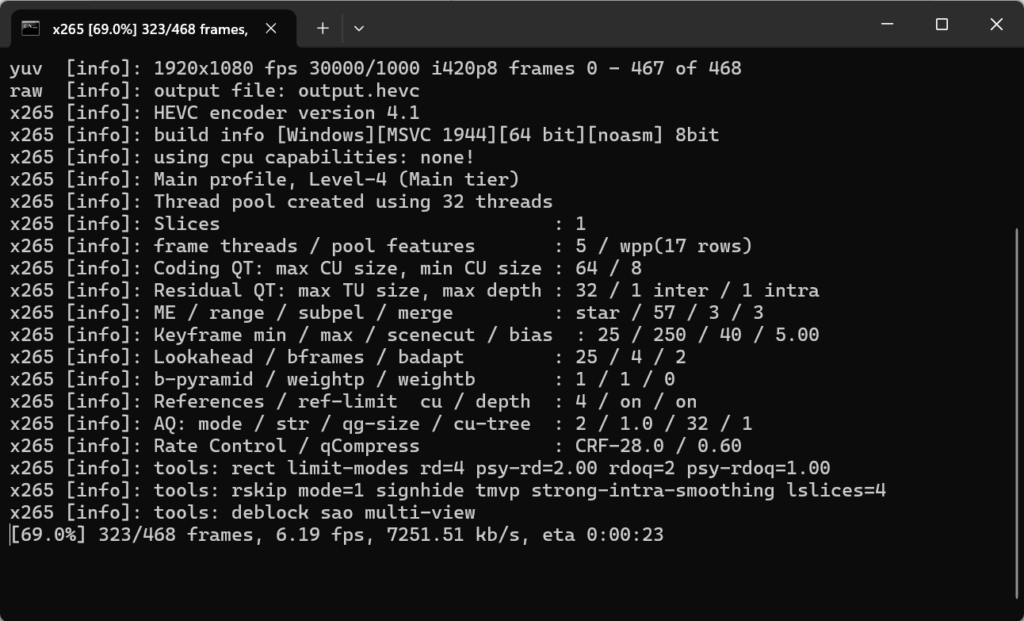
x265 reports the configuration details along with its encoding progress. When the process is done, you should have an encoded bitstream file. In my example, output.hevc.
Remember when we learned that .mp4/.mov files are containers for media that include a lot of useful metadata? And how huge .yuv files contain raw video and no metadata? Well, this third type of file is called an elementary stream, and in this case, it’s encoded with MV-HEVC.
An elementary video stream does include its own metadata along with encoded and compressed video data. But it doesn’t contain audio, subtitles, or other data types. So, to make this bitstream something we can easily play, we need to put it into its own .mp4/.mov container.
Container Packaging
We need one more tool. While FFmpeg is able to mux video into a container (along with many other media types), version 7.1 can’t yet mux MV-HEVC into a .mp4/.mov file without issues. So, we’re going to use another common video tool called MP4Box. Download the latest version of the open source GPAC tools and install them on your computer (and optionally add the tools to your search path).
To validate that you have MP4Box installed and available:
mp4box -versionThis should report the version of MP4Box you have installed. As of this writing, mine reports 2.5.
Now, we need to concern ourselves with color once again. We “repeat” the color information here to include it as nclx/colr box metadata in our output container. The good news is that we already have the color information in our ffprobe report. We just need to format it for MP4Box.
The color values for MP4Box are pulled from our ffprobe output in this order: color_primaries, color_transfer, color_space. The last value represents the color range, and we use on if our ffprobe color_range=pc (“full”) or off if color_range=tv (“limited”).
To continue our example:
mp4box -add output.hevc:fps=30:colr=nclx,bt709,bt709,bt709,off -new output.movBecause we installed the FFmpeg tools, you should now be able to play the output video file with ffplay:
ffplay output.movAdding Audio
If you’d like to mux the audio from your original video into your new video:
ffmpeg -i output.mov -i mvhevc_input.mov -c:v copy -c:a copy -map 0:v:0 -map 1:a:0 -shortest final_output.movThen:
ffplay final_output.movVexu Metadata
So far, we’ve managed to encode left- and right-eye views into a MV-HEVC video stream, wrapped it in a .mp4/.mov container, and muxed in the original audio. And we’ve seen (and heard) it play! But, it’s missing one final element that enables Apple devices to recognize the video as spatial and to play it correctly in Vision Pro. As background, you can read more about Apple’s vexu metadata in my Spatial Video post. Or, have fun exploring the inner structure of your own MV-HEVC files with the online VTC Lab Media Analyzer.
I had originally planned to include a method to add this metadata using standard tools, but it risked adding a lot more length to this already long post. Fortunately, there are two free tools that can inject the vexu metadata for you.
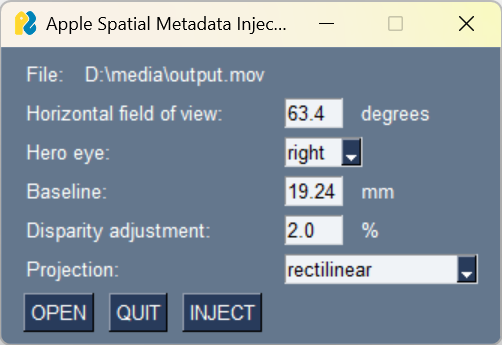
ASMI
The first free tool, created by Dean Zwikel (who also made the encoder I keep talking about), is called Apple Spatial Metadata Injector (ASMI), and you can download it directly from his Google Drive. Check out the included Readme for installation and usage instructions. Basically, you choose the file you’d like to add metadata to, set the metadata values accordingly, and choose Inject to create a new output file that includes the vexu metadata. Simple and straightforward.
Spatial
To add metadata on a Mac, you can use my free spatial command line tool. The metadata section of the documentation describes how to create an editable template to add or edit vexu values. Essentially, you create a text file like:
--remove vexu
--set vexu:cameraBaseline=65.0
--set vexu:eyeViewsReversed=false
--set vexu:hasAdditionalViews=false
--set vexu:hasLeftEyeView=true
--set vexu:hasRightEyeView=true
--set vexu:heroEyeIndicator=right
--set vexu:horizontalDisparityAdjustment=0.0
--set vexu:horizontalFieldOfView=90.0
--set vexu:projectionKind=rectilinear
Save the file with a name like vexu.args, then use it in a command line:
spatial metadata -i final_output.mov --args vexu.args -o final_output_vexu.movThis creates a vexu-injected output file named final_output_vexu.mov.
NVIDIA
But what about NVIDIA? You said that you’d show us how to encode to MV-HEVC with NVIDIA tools! Indeed I did. Note that the tool we’re going to use is included as a sample in their Video Codec SDK and that the documentation states:
The sample applications provided in the package are for demonstration purposes only and may not be fully tuned for quality and performance.
Something to keep in mind.
Building
There is a lot to read in the ReadMe, but to get the AppEncCuda sample to run, we first need to download and install the CUDA Toolkit. For what it’s worth, I chose the Custom (Advanced) option, left only CUDA selected at the top level, and within the CUDA sub-options, I deselected the three Nsight-related entries. I did this to focus on only the components needed to build AppEncCuda. Also make sure that you have an up-to-date NVIDIA video driver on your system.
Next, you need to download v13 (or later) of the NVIDIA Video Codec SDK. After agreeing to the license agreement, select Download Now and note where the .zip file is downloaded. From File Explorer, right-click the downloaded file and choose Extract All….
Like we did for x265, launch the Developer Command Prompt for VS 2022, and change to the Video_Codec_SDK_x.y.z/Samples directory (where x.y.z is the version that you downloaded). Then, create a new build sub-folder, and change to the newly created directory:
mkdir build
cd build
To generate the necessary Visual Studio project files:
cmake -Wno-deprecated -G"Visual Studio 17 2022" -A"x64" -DCMAKE_BUILD_TYPE=Release -DSKIP_FFMPEG_DEPENDENCY=TRUE -DCMAKE_INSTALL_PREFIX=. ..Then, to build release versions of the sample apps:
cmake --build . --target install --config ReleaseDepending on your Windows installation, you may be prompted to install a version of the .NET Framework before the build starts.
Also, since we didn’t install all of the dependencies for all of the sample apps, you’ll see some warnings and errors that you can safely ignore. For example, you’ll probably see a lot of errors related to the AppEncQual sample, but we don’t need that for encoding to MV-HEVC.
When the build is complete, you should have a Release directory you can change to, then run our newly built AppEncCuda sample app to see a list of its options:
cd Release
AppEncCuda -h
Encoding
Refer to our earlier section about exporting your source video to an interleaved raw .yuv format, since that’s what the NVIDIA encoder requires.
Just like we did for x265, we use main (8-bit source video) or main10 (everything else) for the profile level. The preset values range from p1 to p7 with p7 being the slowest. We also use a Constant Rate Factor (crf) value of 28, set as the -cq parameter here. The longer parameter names set values to enable MV-HEVC output.
AppEncCuda -i stereo_interleaved.yuv -s 1920x1080 -if iyuv -codec hevc -profile main -preset p7 -rc vbr -cq 28 -fps 30 -enableMVHEVC 1 -insertHevc3DReferenceDisplayInfo 1 -o output.hevcWhen the encode is complete, you can add this video stream to a container using MP4Box, just like I described earlier.
mp4box -add output.hevc:fps=30:colr=nclx,bt709,bt709,bt709,off -new output.movMux in the original audio:
ffmpeg -i output.mov -i mvhevc_input.mov -c:v copy -c:a copy -map 0:v:0 -map 1:a:0 -shortest final_output.movLastly, use either of the aforementioned tools to add vexu metadata so that your video file is recognized as spatial on Apple devices.
Encoder Efficiency
In my article, Encoding Spatial Video, I talk a little bit about the efficiency of Apple’s MV-HEVC encoders and note that there appears to be two different encoding techniques in use.
In a similar vein, I’ve included diagrams that show the relationship between the payload of layer 0 (blue) frames and layer 1 (green) frames when encoded using the above commands. As I said in the prior article, because the content of each video is unique, these diagrams are only useful to illustrate the relative payload difference between layers. Results with your own content will most definitely vary. Additionally, because this article isn’t a performance test or quality evaluation, I haven’t labeled which encoder produced each diagram.
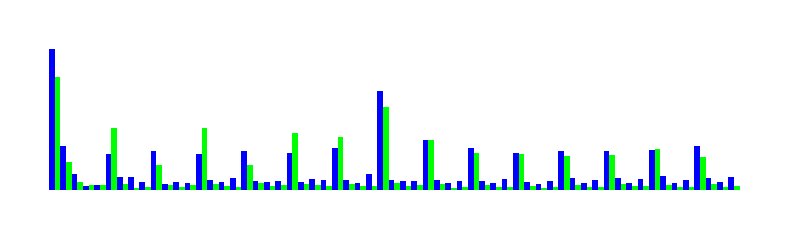
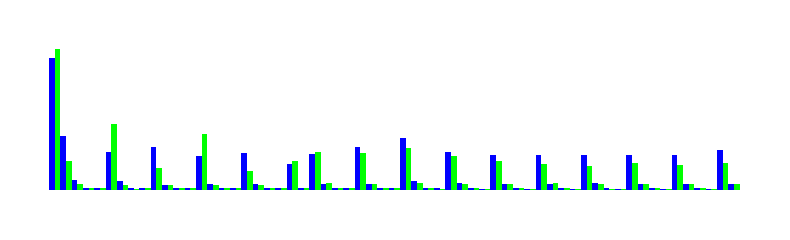
After testing the above commands with three of my own videos, it appears that both encoders achieve around 0-30% savings in the second layer. While this is lower than some predictions, it’s important to remember that these are first-version MV-HEVC encoders that don’t yet support the more sophisticated features of a mature HEVC stack (like multi-pass encoding). I think we can only expect improvements over time.
At these early stages, it’s worth experimenting with the various configuration options and settings by encoding your own content.
AIVC Tool
While I was writing this blog post, Dean Zwikel released another free tool called Apple Immersive Video Creator (AIVC). This Windows-based tool automates an embedded version of x265 (just like the one we built above) and integrates his vexu metadata injector into an all-in-one solution. He has created a free Google Group to provide access to the tool and to remain in touch with his users. There is no doubt that an automated tool like this is an easier path than the workflow I described above. Thank you, Dean!

Conclusion
If you read this whole post…wow! Thank you! And if you actually built and used both encoders, achievement unlocked! You’ve definitely run the gauntlet! Neither of these workflows is simple, but both will get you a valid, high-quality MV-HEVC-encoded file suitable for stereo playback on Apple Vision Pro.
If you’re like me, you’ll find that half the battle is in the workflow and the tools. I think we’re all crossing our fingers, hoping that these improve over time.
If I missed anything, neglected a tool or technique, or you just want to talk about spatial and immersive video, please contact me directly.
Happy encoding!
Leave a Reply