I heard from many of you that my WatchKit Development Tips post was helpful. So, in the same vein, I’ve assembled a set of tips that pertain specifically to the use of images in a WatchKit app. I hope you can find at least one item that helps with your own design and development.
First, it’s helpful to understand how you can get an image
onto the Watch screen. WKInterfaceImage,
WKInterfaceGroup,
WKInterfaceButton,
and WKInterfaceController
provide the only elements that accept an image. Of those, WKInterfaceImage
(akin to UIImageView in UIKit) is the single control that includes an image as
its primary content; the other three only provide support for a background
image. Among these, WKInterfaceController’s background image must be set in
interface builder.
Second, recall that your Watch extension (where all of your
logic and code resides) runs on the iPhone, while your Watch app is really just
a bundle of storyboards and assets that are installed on the physical Watch
hardware. This means that for an image to be displayed, it somehow needs to
make its way from the iPhone, through the air, and to the Watch itself. There
are three distinct ways this can happen:
- Include the image in your Watch app bundle. In
this case, the image is transferred to the Watch during installation of the
Watch app. This is the best way to store images that you can generate ahead of
time.
- Use a setImage:–
or setImageData:-style method on one
of the mentioned controls. These methods accept a UIImage or equivalent NSData,
and the image is transferred to the Watch at the time of the call. Images
transferred this way are not stored for future use. These methods are
acceptable for one-off style images that you don’t intend to use again.
- Add the image to the 5MB per-app Watch cache.
Transferring any image to the Watch takes time and battery. If you have an
image that can’t be generated ahead of time and stored in the bundle, and you
intend to use it more than once, I highly recommend sending the image to the
Watch for storage in its cache. After adding the image to the cache with a
named key, you can subsequently refer to it using setImageNamed:-style
methods.
With all of that preamble out of the way, let’s get to the rest of the tips.
- Use an assets catalog. I don’t think that this is explicitly required, but there have been too many horror stories of developers who used “loose” image files (i.e. in the bundle, but not in an assets catalog) that worked in the simulator but not on actual hardware. Save yourself the grief. Assets catalogs work very well.
- Make sure the assets catalog is in the WatchKit app, not the extension. As I mentioned earlier, the WatchKit app is transferred to the Watch during installation.
- Developers have reported that there is currently a 50MB size limit on the WatchKit app (not the extension). This means that any pre-generated images you intend to install must fit within this limit.
- It is a very good (though not required) practice to name images with a “@2x” suffix, since all Watch screens are currently 2x Retina displays. By including the @2x suffix, Xcode can categorize the image correctly when you drag it into an assets catalog.
- If your filename does not include a “@2x” suffix, Xcode may add it to a 1x slot, and when the image is loaded by your app, it’ll show up at twice its intended size. If this happens, you can manually drag the 1x file to a 2x slot, and the image will be sized correctly.
- All image pixel (not point) sizes should be an even multiple of two. While you can get away with odd-sized images in some situations (for example, if you place a WKInterfaceImage using the Position and Size fields in the inspector panel), even-sized images will always work.
- If you configure a WKInterfaceImage with its Mode set to Center (which will center your image in the control without resizing it) and you provide an odd-sized image, the result will be blurry. For example, if your image is 59 pixels (not points) wide, the image control will center it at pixel 29.5, blurring every pixel in the image. Here are two actual screenshots at 400% magnification.

- Related to the previous centering mode, this is likely the reason that Force Touch menu items sometimes look blurry if you provide odd-sized images. My guess is that the Force Touch menu is using WKInterfaceImage controls with their Mode set to Center.
- Keep in mind that the even-sized rule applies to dynamically generated and downloaded images too. If you download an image that has an odd pixel size in either dimension, please be sure to carefully test your scenario to ensure that it doesn’t look blurry on the Watch. To be safe, process the image and add a single-pixel row or column so that it has an even dimension.
- For each image in your Watch assets catalog, I recommend setting Devices to Device Specific and checking only Apple Watch. If you have a single image that works for both the 38mm and 42mm Watch screens, you can safely add it only to the 2x slot. But, if you have two different images, add one for 38mm, another for 42mm, and leave the 2x slot empty. By leaving the 2x slot empty, you’ll avoid having a third (and duplicate) image in your Watch app bundle. The downside is that you won’t see the preview image in interface builder, unless you specifically switch to the 38mm or 42mm screen size.
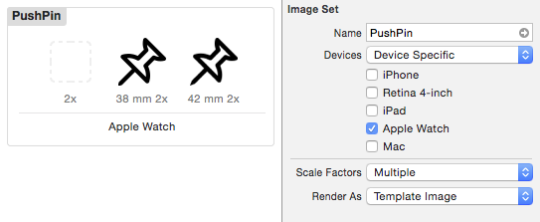
- The Render As setting in the inspector panel for asset catalog images is often overlooked. By setting it to Template Image, you can dynamically change the color of an image with the setTintColor: method on WKInterfaceImage. You can also set the tint color in the inspector panel.
- When numbering animated images in the Watch app bundle, be sure to avoid leading zeros. For example, use Frame1, Frame2, Frame3, not Frame001, Frame002, Frame003. The animated image filename algorithm won’t correctly recognize images that are numbered with leading zeros.
- The addCachedImageWithData:name: method on WKInterfaceDevice adds your NSData to the cache without additional conversion. That means that you can achieve significant cache savings and transfer time by encoding with UIImageJPEGRepresentation(). Experiment to find the best quality setting.
- The addCachedImage:name: method on WKInterfaceDevice appears to use PNG encoding behind-the-scenes. This is a safe choice, as PNG is a lossless format with alpha channel support. In my testing, the cache cost for using this method is equal to the size of UIImagePNGRepresentation() + 753 bytes. I have no idea where the additional 753 bytes come from, but if you send your own PNG-encoded image using addCachedImageWithData:name:, you’ll immediately save 753 bytes per image.
- Because of the aforementioned 753-byte penalty, I recommend that you always cache images using addCachedImageWithData:name:.
- According to an Apple employee in the developer forums, you are allowed to cache images on a background thread. In fact, this is what I do in my own Watch app to speculatively cache the next image before it’s needed.
- Unfortunately, there is currently no way to send animated images to the cache as individually numbered frames (like you can with animated images in the assets catalog). You have to send a full animated UIImage, and unless you’re careful, these can be quite large.
- You can check the size of your images using the cachedImages property on WKInterfaceDevice. The property contains a dictionary of key names along with NSNumbers that indicate the cache cost of each image in bytes.
- There is no built-in method to intelligently evict images, so you may want to wrap the cache with your own eviction logic. In my case, I track a “last use” time for each key, and under memory pressure, I evict the oldest cache entry before adding a new one.
- WatchKit doesn’t currently include an activity indicator (like UIActivityIndicatorView), but you can easily display a series of animated images while long-running tasks are executing. When the task completes, stop and/or hide the animation. Check out my JBWatchActivityIndicator project on GitHub for some Apple-like images or to create your own.
- It’s a common scenario to fetch images while a user is scrolling through a WKInterfaceTable. If you’re downloading images over the network, offload that task to your primary iPhone app by using the openParentApplication:reply: class method on WKInterfaceController. To ensure that your iPhone app isn’t terminated during the download, begin a background task immediately with the beginBackgroundTaskWithName:expirationHandler: method on UIApplication and use endBackgroundTask: when your download is complete. When you receive the reply in your Watch extension, dispatch to a background queue to cache the image data, then dispatch back to the main queue to update the image.
- Related to tables, while you can set a background image on WKInterfaceController, note that it will scroll with your content. There is no method to create a fixed background.
- There is no provision for a launch screen image in WatchKit. While it existed in early betas, it is no longer available.
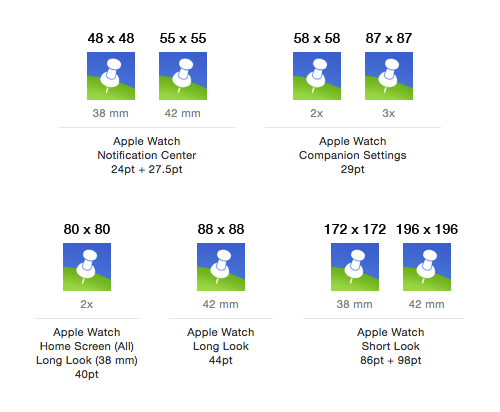
- The app icon sizes that are needed for a Watch app can be confusing, so I’ve added their actual pixel dimensions above each icon. Note that if you’re using the assets catalog (as you should), the filenames don’t matter as long as the images are in their correct slots.
- Don’t use a black background for your Watch app icon or your app will be rejected. It has been reported by some developers, however, that black backgrounds that have an “edge” or stroke around the icon circle have been accepted. From Preparing Your App Submission for the Apple Watch:
Avoid using black in the background of your icon to keep it from blending in to the black Apple Watch home screen.
- The only way to stack or layer images in WatchKit is to set the background image of a supported grouping element (like WKInterfaceGroup) and include other image controls within the group.
- Beyond the built-in Notification template, there is no way for an image to overlap the Watch status bar.
- To easily round the corners of an image, place it in a WKInterfaceGroup and use setCornerRadius:.
- If you need an interface that can’t be designed within the limitations of the standard WatchKit controls, consider dynamically drawing a custom interface image in your WatchKit extension, then transmitting it to the Watch. For interactivity, set the image as a group background and include “blank” controls on top to capture user input. This isn’t always easy to pull off, but it can be done.
- If you want to display a single frame from an
animated image sequence, use startAnimatingWithImagesInRange:duration:repeatCount:
to specify just that frame. Otherwise, if you use setImageNamed: with Frame1,
the WKInterfaceImage control will display Frame10 if it exists, because it’s
the 0th frame of the Frame1 animation. Yes, someone was trying to
be too clever with file names.
I hope that something in this list of tips is helpful. Happy coding!
Leave a Reply