Fueled by your interest and encouragement from developers like Brian Gilham (curator of the very useful WatchKit Resources site), and the fact that I’ve already shipped my Apple Watch app, I’ve decided to share some interface controller techniques that I’ve used in my own app. I call them “advanced,” only because they’re techniques that most developers won’t need, not because they’re difficult to understand or implement.
Most of you are probably used to working with UIKit, and at first glance, you might think that WatchKit works along the same lines. Indeed, for both technologies, you can create your interface using the familiar interface builder features of Xcode: you connect controls to IBOutlets, setup action methods for control events, and position and size elements. You implement some logic in UIViewController for UIKit and WKInterfaceController for WatchKit. Things feel similar.
It’s only when you push your WatchKit app a little further that you begin to notice some key differences. It starts with passing information to another controller. In UIKit, it’s common to create a method like initWithThing:(JBThing *)thing on your UIViewController subclass or to set a property like setThing:(JBThing *)thing. In WatchKit, you call a method like presentControllerWithName:context: or implement contextForSegueWithIdentifier:. A little different, but the paradigm still makes sense.
Then, one day, you decide that you’d like to pass information back to the presenting interface controller, and that’s when the world changes. Unlike UIKit where you have a reference to all of your objects, WatchKit tries its best to abstract those references away, and you end up with methods that accept string identifiers and don’t let you allocate objects directly. And try as you might, you can’t seem to get a reference to your WKInterfaceController objects! You ask, “How am I supposed to implement a delegate pattern without a reference to my presenting interface controller!?”
Before I get to the solution that I’ve implemented, I’d like to step aside and point out that NSNotifications are a fantastic (and easy) way to communicate across controllers that don’t have direct or indirect references to each other. A lot of developers that I talk to don’t realize that notification center delivers notifications to observers synchronously, meaning that the postNotification:-style methods do not return until all observers have received the notification. It’s basically a way to package up any information you’d like and immediately call zero-to-many observers that don’t need to be aware of each other. This is great solution for a set of WKInterfaceController instances.
JBInterfaceController
If NSNotifications don’t solve your communication needs, you can consider the techniques that I use in the JBInterfaceController class that I created for my own Watch app. Initially, I implemented these techniques to work around a nasty bug that’s present in iOS/WatchKit 8.2 and 8.3 where the status bar disappears in certain situations. Eventually, I realized that these techniques are useful to make WKInterfaceController just a bit more like the UIViewController patterns I am already familiar with.
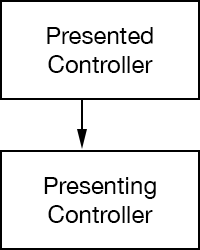
As mentioned, with WatchKit, you never allocate your own WKInterfaceController instances. The closest you get to referencing a controller is by indirectly passing a string identifier using methods like presentControllerWithName:context:. You can pass anything you’d like for context, and typically, this is a data model or perhaps a dictionary of useful values. Instead, what if you passed a reference to self? We at least have that reference. Feels almost like cheating, doesn’t it? Don’t worry…the WatchKit police won’t show up. Using that technique, we end up with something like this:
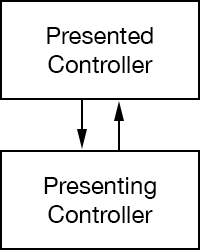
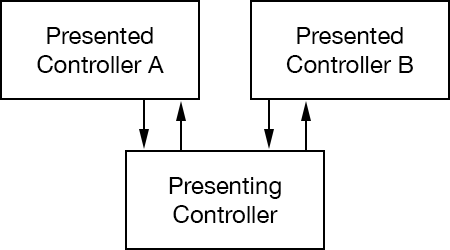
That’s a good start: in awakeWithContext:, our presented controller now has a direct reference to the presenting controller. To complete the UIViewController-like concept of presentedViewController, though, the presenting controller also needs a reference to the presented controller. So, in my solution, the presented controller (still in its awakeWithContext: method) passes its self reference to the presenting controller, and the graph is complete.
This same technique is used to build an array of presentedControllers when multiple pages
are involved.
With these relationships in place, controllers can begin to inform each other of important events in the controller life cycle that aren’t provided by WatchKit. For example, in my JBInterfaceController class, a presenting controller can now process events like presentedController:didAwakeWithContext: and presentedControllerWillActivate:.
Additionally, because we’re now more aware of the life cycle, we can inject useful patterns like configuration blocks for presented controllers. With JBInterfaceController, a configuration block is executed by the presenting controller as soon as these references are in place. The block is passed a reference to the presented controller, which makes it very easy, for example, to setup delegate patterns. Without a technique like this, delegate patterns between controllers simply don’t exist in WatchKit.
Again, because we’re now more aware of the life cycle, JBInterfaceController accepts an optional dismiss block that is automatically executed when a presented controller is dismissed.
Finally, because the presenting controller is aware of all its presented children and when they activate and deactivate, it can determine a paging direction (e.g. whether the user is moving forward or backward through a page-based interface) and speculatively inform the next controller with a prepareForActivation event. In my app, I use this event to pre-cache the upcoming image on a background thread. That way, when the user moves to the next page, the image is already in the cache and ready for display.
JBInterface
Switching gears, I’d like to cover a different technique that I use to update the controls in my WatchKit app. As you may know, you can only update an interface when it is considered active (see my WatchKit Controller Life Cycle for an explanation). This means that if you want to update, for example, a label on a presenting interface controller while a modal controller is being presented “on top,” you somehow need to wait until the presenting controller is active again before making the update.
Initially, I was trying to stuff all of my update code into willActivate, because that method is called when the modal controller is dismissed. In fact, this is the perfect place to perform the update, and if you have simple needs, this is absolutely the correct approach.
The problem I have is that my main interface includes a WKInterfaceTable with multiple records, and edits made in the modal controller affect what is displayed in the table rows (on top of that, my app updates and re-sorts data with any Core Location change). Trying to intelligently manage the logic of potentially updating an entire table in willActivate was becoming a real challenge. So, I looked to UIViewController and UIView for inspiration.
If you’ve ever written a UIView drawRect: method, you probably recall that drawRect: is automatically called by the view subsystem. In fact, you’re never supposed to call drawRect: yourself. Instead, you let the view subsystem know that your content needs to be redrawn by calling setNeedsDisplay, and the system will call drawRect: sometime later, when it’s appropriate. This also means that you can repeatedly call setNeedsDisplay to invalidate your content and the system will efficiently perform a single drawRect: call as a result.
So, I’ve created a JBInterface class that is influenced by this UIView behavior. My table rows are a subclass of JBInterface, and all update logic for the row happens in an updateInterface method. Like drawRect:, updateInterface is called automatically at an appropriate time (i.e. when its JBInterfaceController is considered active).
To let the system know that the contents of a JBInterface need to be updated, you call setNeedsUpdate, which marks it as dirty. The JBInterfaceController class has an interface property that contains the root JBInterface instance (similar to UIViewController’s root UIView instance). By calling addSubinterface:, you’re adding each table row to the interface (similar to adding subviews to UIView). Of course, adding these subinterfaces doesn’t actually add anything to the screen, but it does allow the interface instances to be updated intelligently.
At this point, I can simply call setNeedsUpdate on any table row at any time I’d like, even if the interface is covered by a modal controller, knowing that the system will automatically call my updateInterface method at an appropriate time. It’s quite liberating. It also cuts down on unnecessary screen updates, which saves iPhone-to-Watch transmission time and battery power.
If you don’t want to build-up a set of JBInterface instances (for example, if you have a straightforward interface controller with no table rows), you can take advantage of the default/root JBInterface instance and call setNeedsUpdate whenever the interface needs an update. Similar to the viewDidLayoutSubviews method on UIViewController that’s called after a UIView layout pass completes, JBInterfaceController calls didUpdateInterface after a JBInterface is updated, so that’s where I do my screen updates. Yes, this means that most of my willActivate methods are completely empty.
If I lost you in the last few paragraphs, don’t worry. Download the JBInterfaceController project from GitHub, and the simple example I’ve included shows this basic form of interface updates.
Key-Value Observing
Last, but not least, I want to point out how Key-Value Observing (a.k.a. KVO) can make your life a lot easier. Again, if your app has simple needs, you probably don’t need KVO. But if you’re handling screen updates with data that can change at any time (especially if you’re propagating changes to your data model between processes), it is worth the effort.
As one example, the table rows I mentioned earlier use KVO to watch for changes to their underlying data model. When a row is notified of a change to its data model, it simply makes a call to setNeedsUpdate knowing that its updateInterface method will be called at the next opportune time. The call could happen immediately, or it could happen after a Force Touch menu is canceled and a modal interface controller is dismissed. The great part is that you don’t have to think about it.
It’s my hope that Apple will implement patterns like this in an upcoming update to WatchKit, especially since my solution is already inspired by existing Cocoa Touch patterns and UIKit. Here’s looking at you, WWDC 2015!
I’ve wrapped all of this functionality in a JBInterfaceController project that I’ve shared on GitHub. I know that the project isn’t perfect, but it has certainly made the logic in my own Watch app much easier to deal with. To take advantage of these techniques, simply create a subclass of JBInterfaceController (which is already a subclass of WKInterfaceController) and add it to your storyboard. Note that I haven’t implemented logic for segues, because I don’t use them in my app; all of my controllers are presented in code. If someone wants to add support for segues, feel free to send a pull request.
This post ended up being a little longer than expected, but I hope that regardless of whether you adopt JBInterfaceController, you’ve at least found an idea or two that can help with your own Watch apps.
Good luck!
Leave a Reply